翻译中
本系列已转换为课程:http://www.howzhi.com/course/7752/
Author/JULIA KUZMENKO via Fstoppers
This is the third part of The Ultimate Guide to the Dodge & Burn Technique. Check out Part 1 and Part 2 where we talked about the fundamentals and tools. Today we finally get to one of the actual setup variations for the Dodge & Burn technique in Photoshop. But before we begin, I’d like to share a few words of caution with you.
Form my teaching practice I have found that knowing the technique – the HOW-TO – never guarantees its successful implementation. In fact, when it’s only the technique that a retoucher knows and nothing else to back up his or her retouching decisions – the results might be quite disappointing.
With Dodge & Burn you must first understand what final result you’re aiming to achieve with the technique. You need to know what looks good and believable, and what doesn’t, because the most common mistakes are over-flattened faces or body parts and randomly manipulated shadows and highlights causing the shapes of the face or body become distorted and unrealistic.
The following are my suggestions to all my students – these are the areas you must familiarize yourself with to be able to masterfully use Dodge & Burn in beauty, fashion & portrait retouching:
1. Human anatomy – there are tons of books on human anatomy for artists (mainly for painters and sculptors, but they are just as helpful for us retouchers)
2. Light distribution (physical) – understanding how the light distributes on forms (for beauty, fashion and portrait photography: on faces and body parts), understanding the qualities of hard and soft light in photography and being aware of the current lighting trends in the type of photography you’re interested in.
3. Understanding the basics of light & shadow rendering in visual arts – with this knowledge you may be able to successfully correct forms by strategically applying new and/or replacing existing highlights and shadows. You also need this knowledge in connection with human anatomy not just simple shapes (cubes and spheres) from a basic painting class (like in the Part 1 of this article).
4. Being familiar with current Makeup artistry trends will also help to make the correct decisions when performing global dodging and burning (AKA “sculpting and contouring”), as well as overall beauty retouching.
5. Understanding the current trends in the beauty and fashion photography along with good sense of visual balance, great composition, good posing and framing – this is super important at the stage of selecting the image to retouch.
All of the mentioned above, unfortunately, cannot be covered in an article. That would be enough material for a 2-year retouching course at an art school (hopefully there will be such formal courses for retouchers one day, fingers crossed for Retouching Academy!).
Also, even when well-explained many of these skills won’t help, they must be developed from within the artists’ mind. It is your vision, your taste and even your personal color preferences that will influence your retouching.
So, to start working on improving your vision, start observing more images by top-professionals in the industry, look at paintings, watch makeup tutorials, flip through beauty and fashion magazines, create a Pinboard for various types of images you’re into.
In fact, right after you finish reading this article, go register on Pinboard and create your first board – name it “Beauty & Makeup”, or “Fashion Advertising by The Leading Global Brands”, or “Top Clients in Skin Care & Makeup Industry” – and start pinning pictures from the top potential clients in the industry you’re interested in.
That’s if you are aiming to be a successful commercial beauty or fashion photographer/retoucher. If you just want to be the best local portrait photographer find the top photographers who shoot portraits and pin their work to your board. Study their posing, framing and dissect their lighting. Do it regularly.
I’ll stress on it: the most important part of it all is to look at beautiful imagery or strong commercial work (whichever you are into) regularly.
Here’s my example: I have collected a few Pinterest boards for studio beauty photography, makeup ideas, hairstyling photography ideas, beauty images in jewelry advertising, etc. I revisit them on a regular basis, add new photos and remove those that I no longer find attractive or inspiring.
My collections change and transform over the years along with my taste, vision and my own photography and retouching skills. I strongly believe every artist needs such modern “visual journals”.
Bottom line: knowing how to dodge and burn in Photoshop isn’t going to make your work better. Improving your vision, taste in photography, correct skin tones preferences, understanding what looks good ALONG with practicing the technique – that is what will take your photography and retouching work to the next level.
And now let’s talk about the D&B setups in Photoshop.
There are very many variations, but it all comes down to accurately lightening and darkening pixels on different layers and color correcting the areas where your manipulations caused color shifts. I will not attempt to give you all the existing setups that can be found out there – at the end of the day everyone of us can come up with our own – instead, I will focus on the two main setups that I myself and most of my colleagues use.
Local & Global D&B
Overall, Dodge & Burn can be arbitrarily subdivided into local (AKA micro, pixel-level) and global (AKA macro, sculpting & contouring). Each subdivision has its own goals and challenges.
When we’re performing local D&B we normally determine the area that needs corrections while being zoomed out.
Then we zoom in very close (depending on the image and your screen size it can be anywhere from 60 to 200%) and work with the tools of our choice and in the particular setup of our choice.
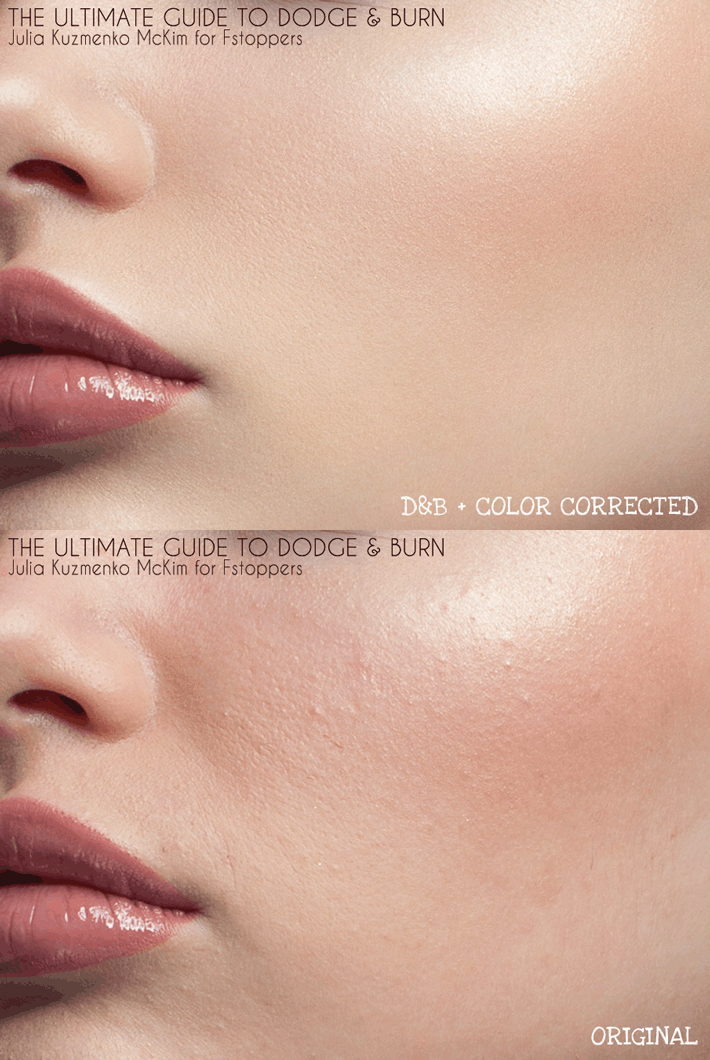
The main idea here is to even out the values of different parts of the skin to achieve that even surface look that we were talking about in the Part 1, remember?

On human skin it will look something like this (at 95% zoom):
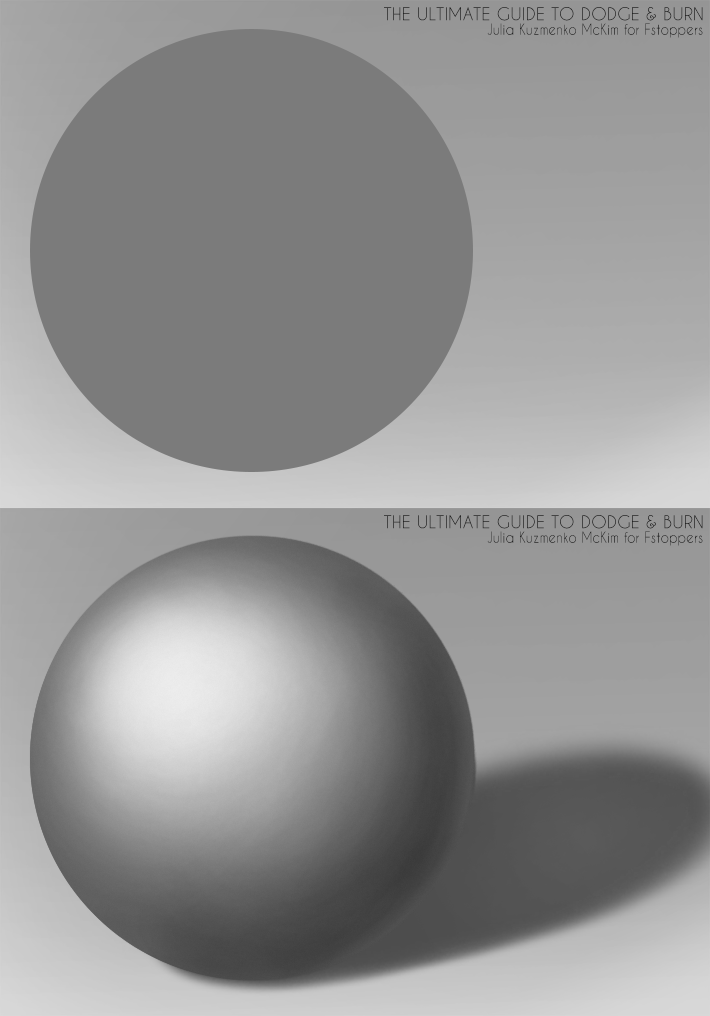
When we’re sculpting & contouring (global D&B) our goal is to add volume and more dimensionality into our 2-dimensional image, just like I demonstrated it in this illustration:
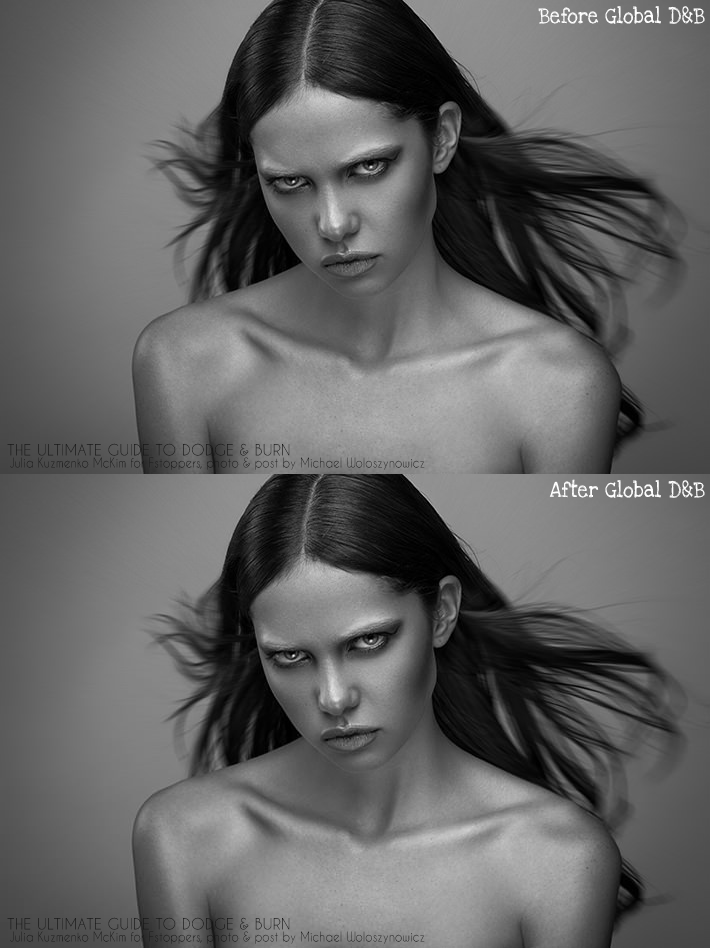
Here’s an actual photo by my friend, Fstoppers and Retouching Academy colleagueMichael Woloszynowicz, in which he added some accents and volume to his shot with global D&B:
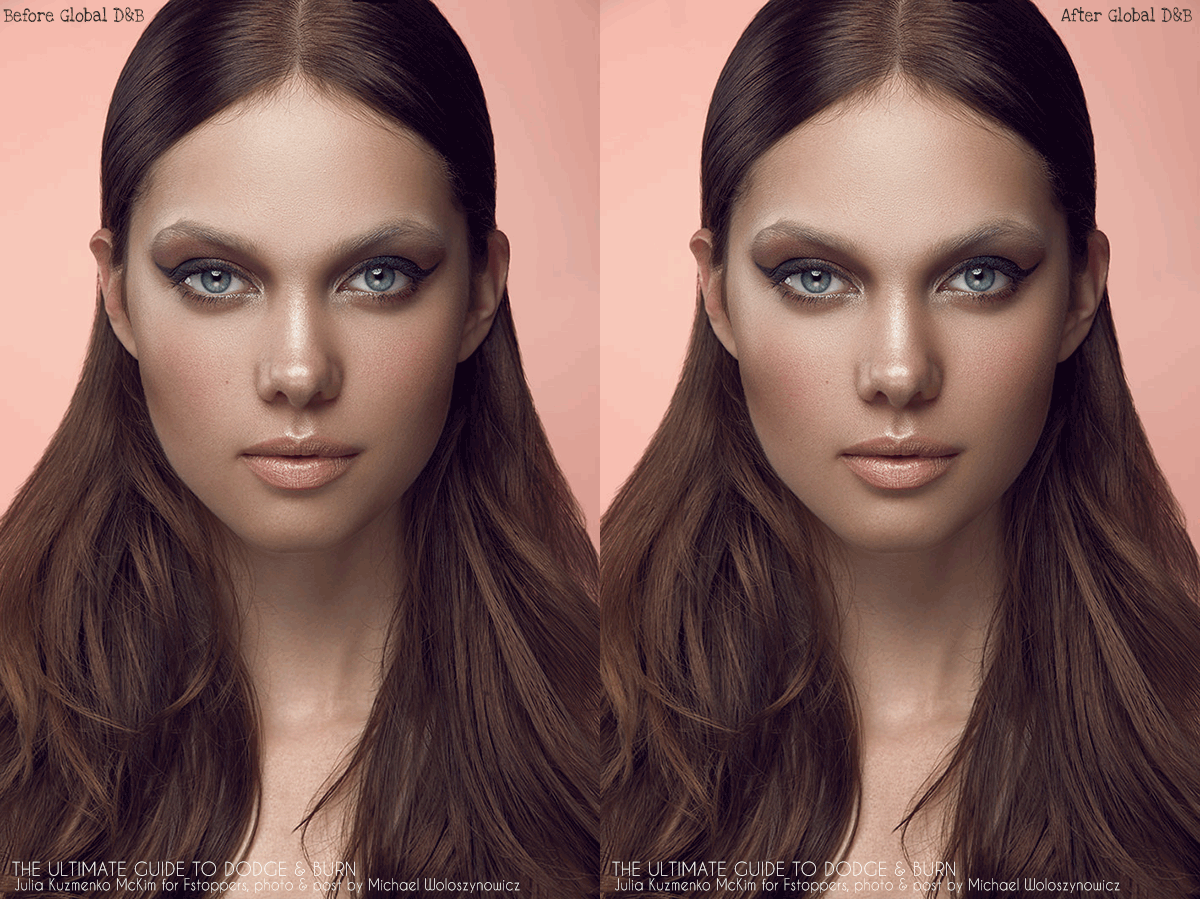
And another example in color:
The conceptual difference between the two [local vs. global D&B] is obvious, and technically they are also different in the way the brush strokes are applied.
Local D&B is normally applied in tiny dots and lines, while the global D&B will be represented by large areas painted with a soft brush, like in the following example by my retoucher-friend and colleague Jesús Vilca:
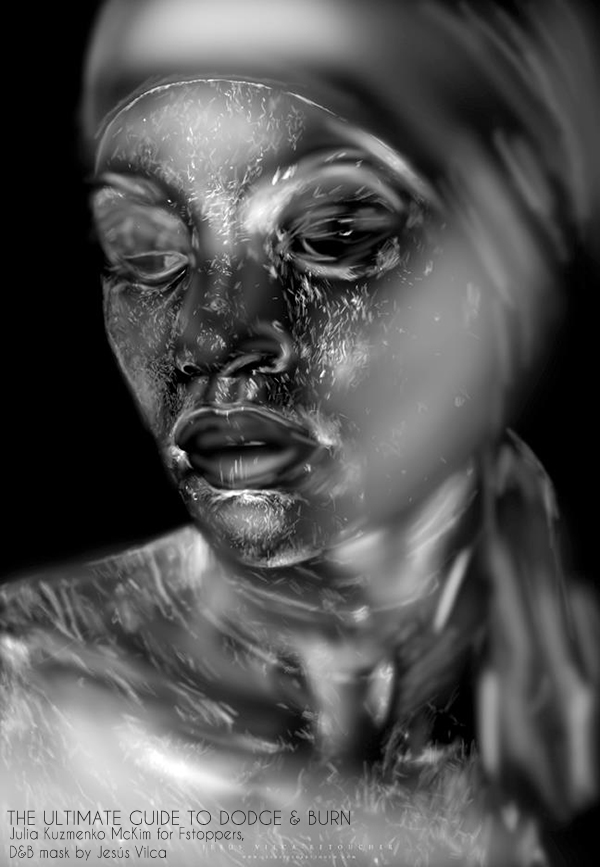
Now that we understand the principal types and their differences, let’s look at how D&B can be technically performed in Photoshop.
This setup up can be used for both global and local D&B, however I personally prefer it for the local D&B mainly, and I will explain why a little later after we look at the other setup.
Here are the steps of the setup and they can be easily recorded in a Photoshop Action, so your Curves are always in the same positions and you know what brush Opacity/Flow you need and what level of lightening/darkening to expect when you paint over the layer masks:
1. After you’ve cleaned up the skin with your basic retouching tools (such as Clone Stamp tool, Healing Brush, Spot Healing Brush, etc) and possibly some Frequency Separation add two Curves Adjustment layers on top of your PSD layer stack.
2. Pull one Curve slightly up (brighten in midtones), name this layer “Dodge” and invert the layer mask color to black (Command (CTRL) + I)
3. Name the other Curves Adjustment layer “Burn”, pull the Curve down (darken in midtones) and cover it with a black layer mask as well.
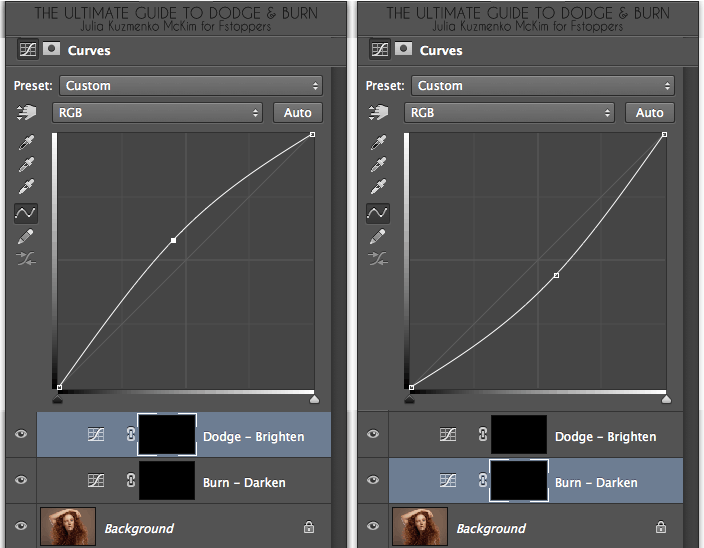
You don’t want to pull the Curves too far away from their default position because then even with the lowest brush Opacity/Flow your brush strokes will be too intense, and we want very subtle changes, so we can build up the effects we are after with a few brush strokes for accuracy.
So, here you go – your basic Curves D&B setup is done. From here on you will have to use your judgement based on your vision, experience and taste to determine which areas of skin need to be brightened and which areas need to be darkened to even out the surface of the skin.
You will work with soft brushes (like the brushes you downloaded in Part 2 of this article) set to very low Opacity or Flow (again, see Part 2).
For the setup I have illustrated above, I usually work with brush Opacity at around 3-5%, so if you pull your Curves away from their default position less than I did in my illustrations, you will be able to get away with a little higher Opacity (or Flow) for your brush as you are dodging and burning.
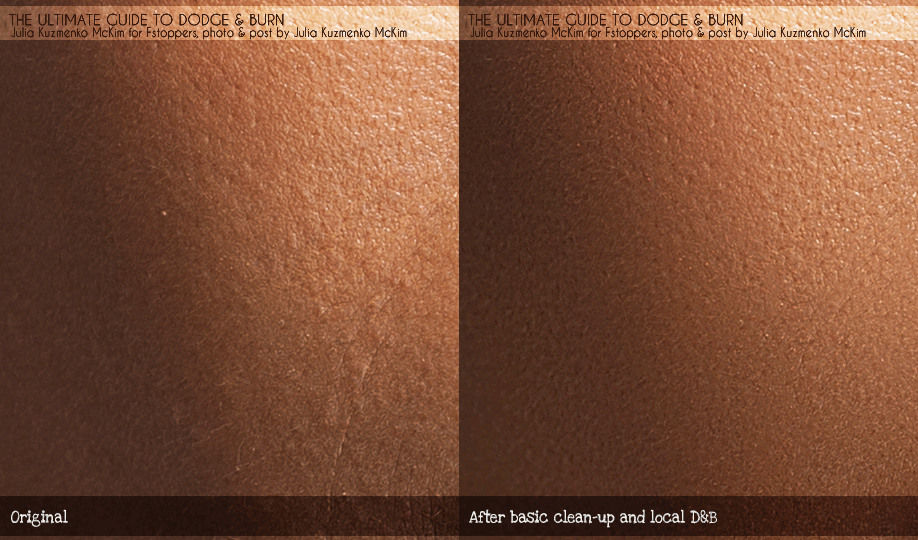
So, after your basic clean-up and local D&B the skin could look something like in the following example (in this illustration I used a photo of an african-american model’s skin, zoomed in at 150%):
One of the main challenges that retouchers deal with when dodging and burning is seeing those differences in values that need to be evened out. It is especially difficult for beginners to determine the areas to target.
But don’t worry, there’s a way to help your eyes with this task.
Let’s talk some biology.
The Retina, Rods & Cones
Wikipedia: Our retina is a light-sensitive layer of tissue, lining the inner surface of the eye. The optics of the eye create an image of the visual world on the retina, which serves much the same function as the film in a camera. Light striking the retina initiates a cascade of chemical and electrical events that ultimately trigger nerve impulses. These are sent to various visual centers of the brain through the fibers of the optic nerve.
The retina is a layered structure with several layers of neurons and the only neurons that are directly sensitive to light are the photoreceptor cells: the rods and cones. Rods function mainly in dim light and provide black-and-white vision, while cones support daytime vision and the perception of color.
The rods are also the most numerous and are more sensitive than the cones.
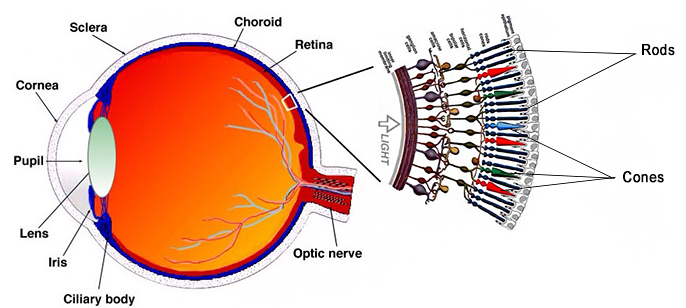
*** If you enjoy learning about the biology of seeing, check out the Department of Physics and Astronomy of the Georgia State University: Light & Vision section. Disregard the fact that it is an ancient looking website, it shares a lot of great info that artists should know.
So, due to the qualities of the photoreceptors in our retina - rods and cones - we can determine luminosity values much better in black & white when our powerful rods are enabled to do the main work.
Thus, if we look at the photo we need to Dodge & Burn through a black & white layer – effectively turning off our cones (color-vision) and allowing the rods to judge what we’re seeing – we can better determine the patches that need to be dodged and the patches that need to be burned. Add some contrast to the picture and you will see the differences in those values even better.
Based on all of the above, which I learned from traditional and digital painting books and magazines, as well as books on the biology of seeing and visual perception in arts, I got into the habit of using a temporary Channel Mixer Adjustment layer set to Monochrome with pumped up Reds to see what areas I need to D&B better. This is how my setup normally would look like:
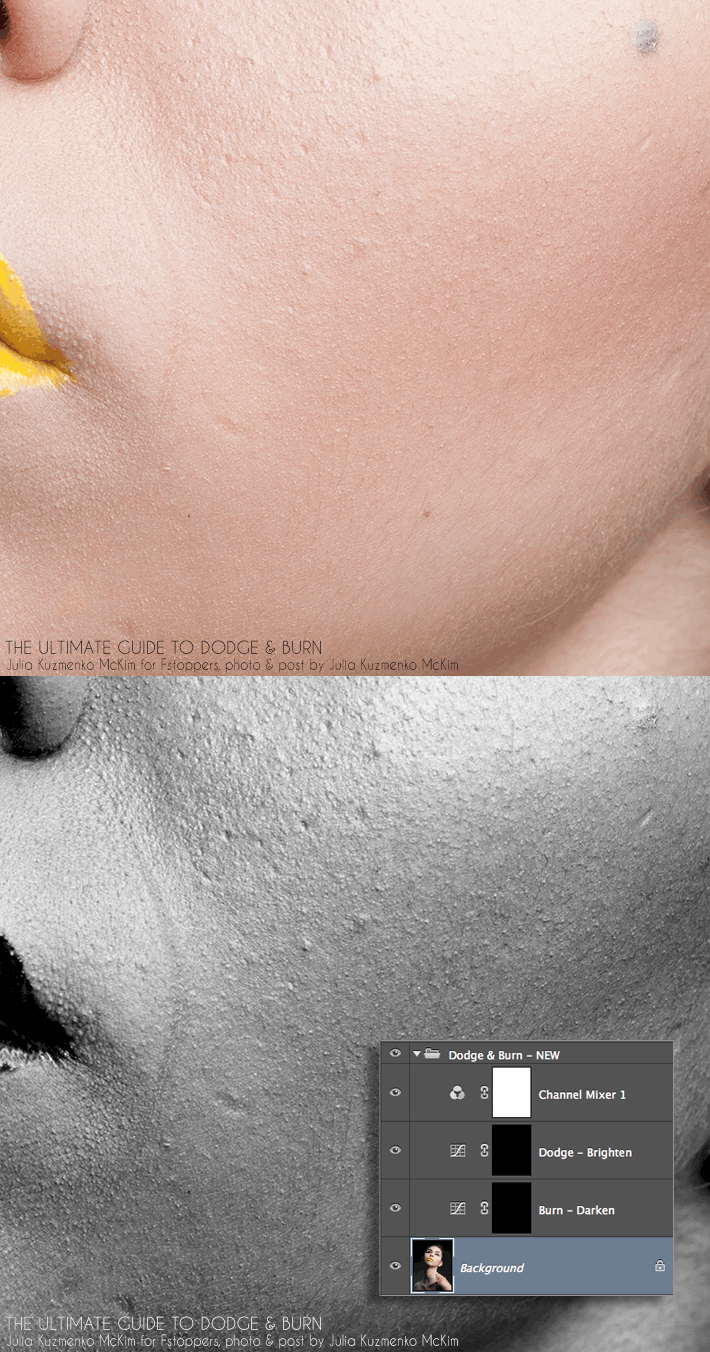
From what I knew from my retoucher-friends most of them also used either Channel Mixer in Monochrome or Black & White adjustment layer as their help layers when Dodging & Burning.
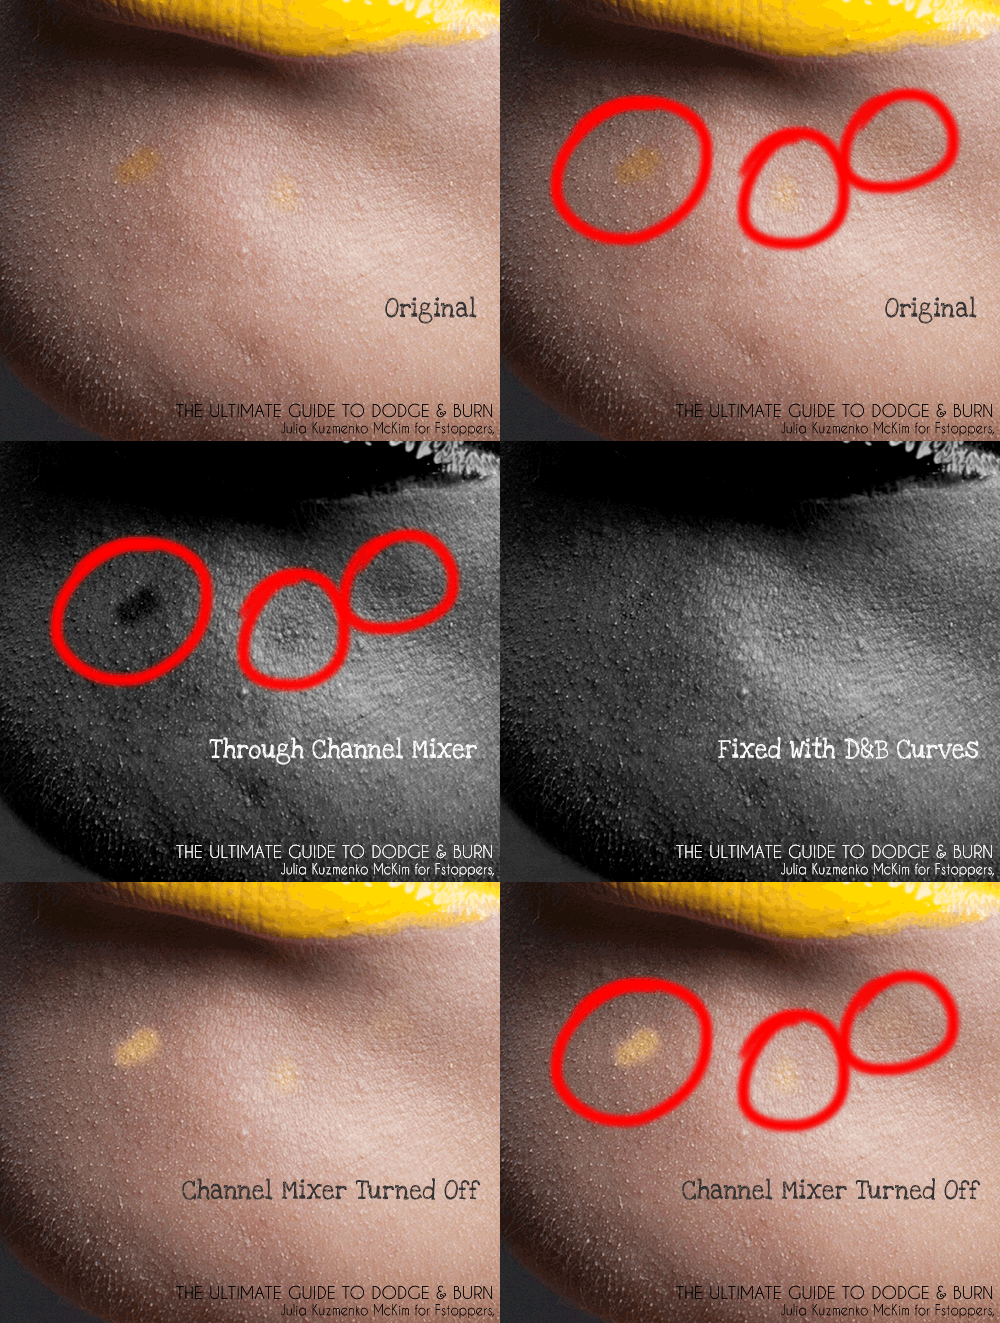
And as much as this layer was helpful, I often had a trouble with it when some areas of skin simply had a higher percentage of Reds rather than darker values. They needed to be color corrected and not dodged– they would look very dark through my help layer (since I darkened Red channel) and I would dodge them more than I needed to, causing even more trouble than there were in the original image.
I always turn my help layers on and off as I progress, so I would catch those false targets for dodging and burning quickly, but some precious working time had been already wasted and more time was required to cancel out what I’d retouched and do it again properly. Disappointment.
Here’s how this method can show deceiving values:
Some time ago I interviewed an amazing beauty retoucher from Vancouver Lulie Talmor, and in our chat she mentioned that she uses a different type of visual aid for Dodging and Burning. And because I admire Lulie’s work I asked her to kindly explain what she does and why.
Lulie was kind and generous enough to invest her precious time into sharing a whole illustrated article onBlack and White Conversions in Relation to Dodging and Burning with Retouching Academy readers.
In short, the common visual aid methods – Black & White and Channel Mixer Adjustment layers – and the way we normally apply them distort the luminosity values of the originals colors when represented in Black & White:
And that causes the problems I described earlier:
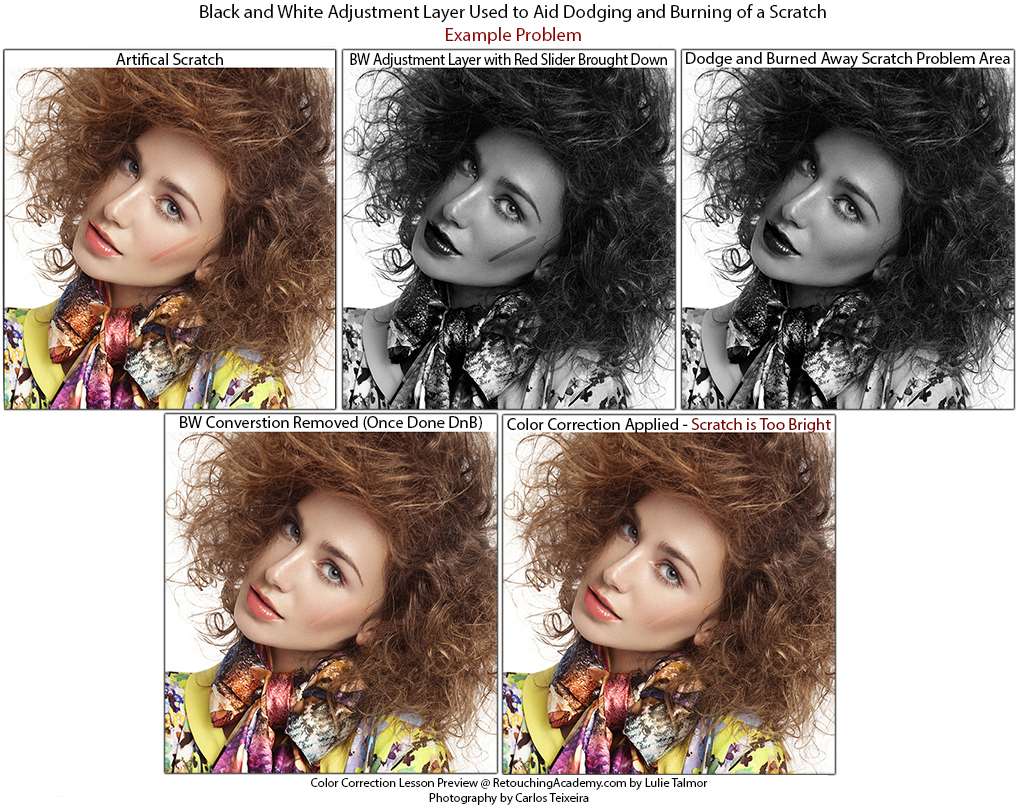
Lulie suggests a couple of different visual aid methods for accurate Dodging and Burning, and the best and the most correct one is using a 50% gray layer set to Color Blending mode on top of your D&B Curves.
And here’s why:
Lulie explains:
This conversion is similar to Black/White Adjustment Layer, except the luminosity value for each color cannot be adjusted, but is fixed to that which most closely represents the values the way the human eye perceives each color. For example, 100% saturated Blue is “darker” than 100% saturated Yellow.
If you’re interested to read more on this and see more of Lulie’s examples, check out her article: Color Correction Lesson Preview: Black and White Conversions in Relation to Dodging and Burning on Retouching Academy.
One step that is often missed by beginner retouchers is color correcting the dodged and burned areas. We won’t go deep into this since it’s a whole another topic, but I would like to bring it up, so you know that your retouching results will be better if you correct the colors you end up with after dodging and burning.
The reason for this is that when you are brightening or darkening pixels, chances are their hues will shift. Usually, dodged areas may appear slightly less saturated than the surrounding non-dodged areas. And burned areas may appear a little over-saturated. Or they may be of just a different hue altogether.
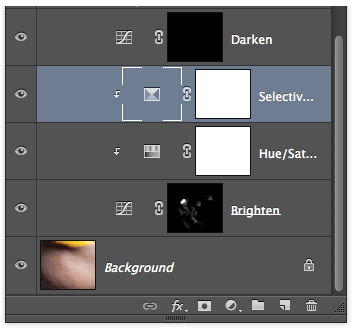
The best way to color correct such side-effects of Dodging & Burning is to use your favorite color-correction tools and layers (Hue/Saturation, Selective Color, new layer set to Color Blending mode, etc.) clipped to the D&B Curves – this way only the areas you have worked on will be affected by your color-correction layers.
This is all for today, and, well, turns out it is still not the end of the story and I will cover one more Dodge & Burn method after I return from Australia in July.
For my Australian readers – I will be presenting at the AIPP event in Gold Coast, QLD (Beauty Photography and Retouching) on the 9th of June. And after that my AIPP colleagues and I will travel to Sydney (June 12-13) and Melbourne (June 16-17) with 2-day Studio Beauty Photography workshops. Only a few spots left in each, hope to see you there!
And for those who are not in Australia – Lulie Talmor and I will be hosting an online weekend workshop on Beauty Retouching: Skin & Skin Tones on the 12-13th of July. We also have only a few spots left there, so join us then!
Hope you’ve enjoyed this part of this never-ending D&B sequel, share your thoughts and ideas in the comments and stay tuned for Part 4!